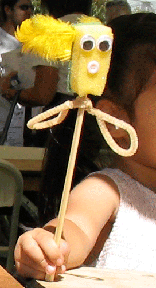
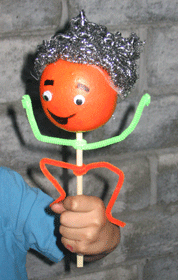
HOW TO MAKE FOUND-OBJECT PUPPETS Ever see your child’s face light up with wonder, amazement and laughter all at once? In fifteen minutes, you and your child can create puppets using objects found at home. Michael Moodoo, arts educator and creator of Moodoo Puppets, presents two simple, effective and easy ways to help you and your child create original puppet characters. Use puppetry to nurture your child’s artistic abilities, social skills, and motor skills. This is a great opportunity to share a fun & creative experience. |
 |
Method #1: Found-Object Rod Puppet
Ingredients:
• A rod (a chopstick, pen or pencil)
• sponge / scouring pad
• feathers
• glue-on eyes or buttons
• pipe-cleaner or twist ties
Tools:
• 8" Fiskar scissors
• colored markers (non-toxic)
• glue
What is a rod puppet? A rod puppet is any puppet on a stick. These are easy puppets to make and can be used as characters in your own puppet show. My group, Moodoo Puppets, often uses simple rod puppets in performances at festivals, museums, and parades in Los Angeles, and as audiences know, the effect is hilarious, surprising, and amazing.
Let's make the puppet:
Step 1) The body. Cut the sponge into the desired shape for the body. If you are using a metal scouring pad instead, this can be gently stretched or pulled apart to create a variety of interesting shapes.
Helpful tips: if you have several different-colored pads available, use one color for the body and a different color for the head!
Step 2) Insert the rod. You may want to get Mom or Dad to help with this. You may need to use scissors to cut a small opening in the bottom of your puppet's body.
Step 3) The face. Glue on the eyes or buttons and draw the face with colored markers. Glue feathers on top for hair.
Step 4) Arms and legs. Wrap the pipe cleaner around the stick and glue in place. Now shape the cleaner to make hands and feet.
Great job! You’ve made a rod puppet! Now you're ready to give the puppet a name and make your own puppet show!
_____________________________________________________________________________

Method #2: Fruit-shaped Rod Puppet
Create a fun fruit-shaped friend using an inexpensive fake fruit or vegetable, commonly found at any "99 cents store".
Ingredients:
• chopstick
• plastic fruit or vegetable
• glue
• rope, yarn or string (any length)
• colorful construction paper
• pipe cleaners (any color)
Tools:
• scissors
• pocket knife
• permanent black marker (Sharpie)
• permanent colored markers (optional)
• hot glue gun (optional)
Step 1) Create a hole in the bottom of the fake fruit
Adults, use a pocket knife to puncture the underside of the plastic fruit. Twist the blade around until you’ve created a hole wide enough for the chopstick.
Step 2) Insert the stick
Now let your child push the chopstick into the hole on the bottom. Add glue around the edges where the chopstick meets the fruit.
Step 3) Add the face
Have the child draw a face directly on the fruit using a permanent black marker, such as a Sharpie.
Helpful Tip: When using a Sharpie or any permanent marker, it is important to protect from harmful fumes. Proper ventilation is achieved by opening windows and doors to let a breeze flow through the work area. Of course, the best ventilation can always be found outdoors, on the patio or deck.
Step 4) Add hair
Add hair using bits of string, yarn or rope of various lengths. The best glue for the job is hot glue, because it is strong and dries cool in a few minutes. Please wear gloves when working with the hot glue to avoid burns. If hot glue is not available, then use Elmer’s glue. You may have to wait a bit longer for the Elmer’s glue to dry, up to an hour. Use colored construction paper for additional hair decoration, like mustaches or eyebrows.
Important note: Children under 10 shouldn’t handle the hot glue gun, and older children should use the hot glue gun only while wearing gloves and with proper supervision.
Step 5) Arms and legs
Cut the pipe cleaner into four pieces to create bendable arms and legs. Hot glue the appendages into place on the fruit. If you are not using hot glue, try taping the arms and legs into place with small pieces of duct tape.
You’re done! Now you’re ready to design your own characters using the techniques you’ve learned. Create all kinds of characters in fifteen minutes or less. Ideas include: an egg (for a two-sided rod puppet, one side could be whole and the other side cracked), a cat, or a lizard! Make as many fun characters as you can dream of! The only limit is your imagination!
HOME / FAQ / ABOUT / WORKSHOPS / COMIX / PARTY STORE / MDP
copyright 2005 by Moodoo Productions - All rights reserved

